- Options Menu
- Context Menu
- Sub Menu
The Options menu is the one that appears when a user touches the menu button on the mobile. This is something that is associated with an activity. In 3.0 and later, this is available in the Action Bar itself for quick access.
In this article, I am showing how to create an Options Menu for devices having Android 2.3 or below.
The Context Menu is a floating list of menu items that appears when a user touches and holds a particular item displayed in the view, which has a menu associated with it.
The Sub Menu is a floating list of menu items that appears when the user touches a menu item that contains a nested menu.
There are two ways of creating an Options Menu in your application. One is by instantiating the Menu class and the other is by inflating a Menu from an XML menu resource. Based on best practices it is always better to define the Menu in an XML and inflate it in your code.
Now, let us start with the example.
I am going to just define 3 menu items in the XML. Inflate it in my code. And when a user clicks on any of the menu items, I just Toast a message on what has been clicked.
NOTE: This is as usual not a practically useful piece, but sticking to my style, I want to keep it as uncluttered and as simple as possible so that the learning happens easily. And the focus is only on what concept we are trying to learn.
So, here is my options_menu.xml that is created in the res/menu folder:
<?xml version="1.0" encoding="utf-8"?>
<menu xmlns:android="http://schemas.android.com/apk/res/android">
<item android:id="@+id/next"
android:icon="@drawable/ic_next"
android:title="@string/next" />
<item android:id="@+id/previous"
android:icon="@drawable/ic_previous"
android:title="@string/previous" />
<item android:id="@+id/list"
android:icon="@drawable/ic_list"
android:title="@string/list" />
</menu>
You see that the Menu root node consists of 3 item leaf nodes. Each of the items consists of an id, icon and title. The resource id is unique to that item and it allows the application to recognize which item has been clicked by the user. The icon is a drawable that should exist in the res/drawable folder and is the one shown in the menu item. The string is the item’s title.
The above assumes that you have three images ic_next, ic_previous and ic_list copied into the drawable folder. It goes without saying that these image sizes should be kept as small as possible.
Once this is ready, we will create a class called ViewOptionsMenu. It’s onCreate(…) method would be a simple one calling the super method and displaying the content as shown below.
public void onCreate(Bundle savedInstanceState) {
super.onCreate(savedInstanceState);
setContentView(R.layout.main);
}
The main.xml just shows the message: “Click on the Options Menu to view the available Menu Options”. This message as per the norm is defined in the strings.xml file that exists in the res/values folder. Here are the contents of the main.xml
<?xml version="1.0" encoding="utf-8"?>
<LinearLayout xmlns:android="http://schemas.android.com/apk/res/android"
android:orientation="vertical"
android:layout_width="fill_parent"
android:layout_height="fill_parent"
>
<TextView
android:layout_width="fill_parent"
android:layout_height="wrap_content"
android:text="@string/welcome"
android:textSize="20sp" android:textStyle="bold" android:capitalize="none" android:typeface="sans"/>
</LinearLayout>
Now, I need to override the method: onCreateOptionsMenu(Menu menu). This method is called by Android the first time the activity is loaded. This is so for Android 2.3 and below. Here is the code:
public boolean onCreateOptionsMenu(Menu menu) {
MenuInflater inflater = getMenuInflater();
inflater.inflate(R.menu.options_menu, menu);
return true;
}
This method is getting a handle to the MenuInflater and using it to inflate the options menu that we have defined earlier in options_menu.xml in the res/menu folder. That is it. The Menu is created. Isn’t is so simple?
Now, that the menu is created, how do we respond to the user when he clicks on the menu. This is done by overriding the onOptionsItemSelected(MenuItem item) method in the Activity itself as shown below:
public boolean onOptionsItemSelected(MenuItem item) {
switch (item.getItemId()) {
case R.id.next:
Toast.makeText(this, "You have chosen the " + getResources().getString(R.string.next) + " menu option",
Toast.LENGTH_SHORT).show();
return true;
…
default:
return super.onOptionsItemSelected(item);
}
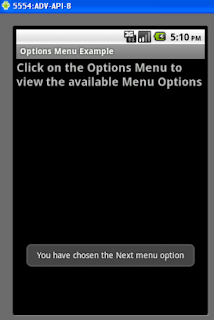
Here, the Android system calls this method by passing a handle to the MenuItem that has been clicked by the user. So, within this method, I check which item has been clicked by retrieving the item id through item.getItemId(). Then I use the switch statement to take action based on the id. If it is R.id.next that has been selected, then we toast a message that the “Next” menu option has been selected. In real apps, it is here that you can call the appropriate method that should take action according to the menu clicked.
Similarly I toast messages for “previous” as well as “list” menus. The complete code is downloadable here.
See the images below for how the options menu appears
and what happens when you click on the options menu:
The whole of options menu works slightly differently for Android 3.0 and above.
And if you want to change the menu options, at runtime, you must override the onPrepareMenuOptions() method. This is called by Android each time the user clicks on the menu. This is useful for enabling, disabling, adding or removing menu items based on the current state of your application.


No comments:
Post a Comment