Ad

Friday, December 3, 2010

Android UI – Inflate from XML (Dynamic UI Creation)


We have seen that we can declare User Interface in Android through XML or we can even create the UI Programmatically. Now, we will see how we can mix the two and use it for building dynamic User Interfaces. One example of such a case would be when on a particular action of the user on one of the UI elements, you need more UI elements to appear on the same screen. How do we achieve this?
You can do it in two ways:
1.       The dynamic part of the UI can be created programmatically. However we saw in my earlier tutorial that it is not a very good way to mix UI and code.  So, we can
2.       Define the dynamic UI too as an XML and use XML inflation to include it into the existing UI.
We will see how to do the 2ndway, which probably is a good practice too.
As always, again a very simple example. Assume I have a very simple linear layout. In that I want to include a button. I can do it as part of the mail XML itself. However, assume that this button is supposed to be reused in many activities and hence I have defined it as a separate XML. How do I include it into the main XML?
So, here is the main.xml
<?xml version="1.0"encoding="utf-8"?>
<LinearLayout xmlns:android="http://schemas.android.com/apk/res/android"
    android:orientation="vertical"
    android:layout_width="fill_parent"
    android:layout_height="fill_parent"
    android:id="@+id/layout1"
    >
</LinearLayout>
Here is the buttons.xml that is also created in the res/layout folder:
<?xml version="1.0"encoding="utf-8"?>

<Button xmlns:android="http://schemas.android.com/apk/res/android"
        android:id="@+id/button_small_left"
 style="?android:attr/buttonStyleSmall"
        android:text="Press to close"
    android:layout_width="wrap_content"
    android:layout_height="wrap_content"/>
And here is the Activity’s onCreate(…) method of the InflateView class:
    public voidonCreate(Bundle savedInstanceState) {
        super.onCreate(savedInstanceState);
        setContentView(R.layout.main);
        final LayoutInflater  inflater = (LayoutInflater)getSystemService(Context.LAYOUT_INFLATER_SERVICE);
        Button b = (Button)inflater.inflate(R.layout.buttons,
                null);
       
        lLayout = (LinearLayout)findViewById(R.id.layout1);
        lLayout.addView(b);
First 3 lines must be familiar. In the 4thline, I am getting a handle to the LayoutInflater through the getSystemService(…) method.  This inflater has a method inflate to which I pass the buttons.xml by passing the parameter R.layout.buttons. Then, I try to append this button to the Linear Layout that already exists and is set as the view in line 2 setContentView(R.layout.main). How to append? I get a handle to the LinearLayoutlLayout and add the new button to it in the last line!
That simple to inflate an XML and append it to an existing view!
However, I have gone ahead and added another bit to this program as shown below:
        b.setOnClickListener(new OnClickListener() {
           
            public void onClick(View v) {
                  //restrict to adding only 1 textview child element
                  if (lLayout.getChildAt(2) == null)
                  {
                  TextView tv = (TextView)inflater.inflate(R.layout.text, null);
                  lLayout.addView(tv);
                  }
            }
        });
On the click of this dynamically added button, I am showing how we can add more to the UI dynamically through inflation. Assume, on the click of the button, you want to show some new text. This TextView is defined in another XML called text.xml which is also in the res/layout folder.
So, I am inflating from this XML and appending it to the LinearLayout view. So, a lot can be achieved for dynamic UI through inflation.

You can download the complete sample code here.

Thursday, December 2, 2010

Creating Android UI Programmatically


So far, in all my examples, I have been using the declarative way of creating an Android UI using XML. However, there could arise certain situations when you may have to create UI programmatically. Sincere advice would be to avoid such a design since android has a wonderful architecture where the UI and the program are well separated. However, for those few exceptional cases where we may need too… here is how we do it.
Every single view or viewgroupelement has an equivalent java class in the SDK. The structure and naming of the classes and methods is very similar to the XML vocabulary that we are used to so far.
Let us start with a LinearLayout. How would we declare it in an XML?
<?xml version="1.0"encoding="utf-8"?>
<LinearLayout xmlns:android="http://schemas.android.com/apk/res/android"
    android:orientation="vertical"
    android:layout_width="fill_parent"
    android:layout_height="fill_parent"
    >
<TextView 
    android:layout_width="fill_parent"
    android:layout_height="wrap_content"
    android:text="@string/hello"
    />
</LinearLayout>
This just contains a TextViewembedded in a LinearLayout. A very trivial example. But serves the purpose intended. Let me show how almost every single element here corresponds to a class or a method call in the class.  So the equivalent code in the onCreate(…)  method of an activity would be like this:
         super.onCreate(savedInstanceState);
      
        lLayout = newLinearLayout(this);
        lLayout.setOrientation(LinearLayout.VERTICAL);
        //-1(LayoutParams.MATCH_PARENT) is fill_parent or match_parent since API level 8
        //-2(LayoutParams.WRAP_CONTENT) is wrap_content
        lLayout.setLayoutParams(new LayoutParams(
LayoutParams.MATCH_PARENT,
LayoutParams.MATCH_PARENT));
        tView = newTextView(this);
        tView.setText("Hello, This is a view created programmatically! " +
                  "You CANNOT change me that easily :-)");
        tView.setLayoutParams(new LayoutParams(
LayoutParams.MATCH_PARENT,
LayoutParams.WRAP_CONTENT));
        lLayout.addView(tView);
        setContentView(lLayout);

Like this any layout view can be created. But from this small example you can notice two outstanding things – very tedious to code for every attribute of the view. And any simple change in the view, you need to change the code, compile, deploy and only then you see the effect of the change – unlike in a layout editor. 


You can download the sample code here.

Wednesday, December 1, 2010

Android Eclipse link Error - New Project

I set up a new environment on my new laptop with Windows7 and jdk1.6.0_21 version. Did the initial setup with eclipse installation, android SDK installation, installing the ADT plugin on eclipse etc. I then imported all the android projects I had created so far. It worked perfectly fine.
Next I created a simple project without any custom stuff, it failed to create with a link error as shown in the image below:

After much trial and error, setting up everything afresh, changing or creating a new workspace, nothing seemed to work. I noticed that the Android package was not visible in the Java build path that you get to see in the project properties. So, finally I found a manual workaround to overcome this problem if you mandatorily want to continue working in the same workspace
Solution: Same workspace:
The manual resolution I found is to make a classpath entry in the .classpath file outside the eclipse environment.
The .classpath file may have such an entry before you edit it:
<?xml version="1.0" encoding="UTF-8"?>
<classpath>
     <classpathentry kind="src" path="src"/>
     <classpathentry kind="src" path="gen"/>
     <classpathentry kind="output" path="bin"/>
</classpath>

So add an entry for the android framework to be included as shown below:
<?xml version="1.0" encoding="UTF-8"?>
<classpath>
     <classpathentry kind="src" path="src"/>
     <classpathentry kind="src" path="gen"/>
     <classpathentry kind="con" path="com.android.ide.eclipse.adt.ANDROID_FRAMEWORK"/>
     <classpathentry kind="output" path="bin"/>
</classpath>

What actually corrupted my workspace, i have not yet figured out. However, while searching on the web for all possible solutions, I came across the announcement on the eclipse forums that Eclipse 3.3 to 3.6 on windows platform is not stable with the JDK version -  jdk1.6.0_21. Hence we need to either roll back to patch 20 or upgrade to 22. I have upgraded and see that eclipse is far more stable now.
Please see this link for more details on the windows and jdk problem mentioned above:
Solution: Different or new workspace:
Just upgrade your JDK to jdk1.6.0_22 and point eclipse to use this as the default JDK. Create a new workspace and you are done. It fixes the problem.
Hope this helps many not to waste time on searching a solution that is not to do with the way you are coding but with the environment set up itself. I had to spend quite a bit of my precious time before figuring this out. 

Sunday, September 19, 2010

Sample Code Download Link

Hi,

I got a lot of requests for alternate download sites (for the Sample Code). So, I have put all the sample code into one page and here is the link to the same. Hope this helps you.

https://sites.google.com/site/saigeethamn/home/android-tutorial-code-for-download

Tuesday, July 13, 2010

Google debuts DIY code tools for Android phones

BBC News - Google debuts DIY code tools for Android phones

This seems to be very interesting stuff... though at the outset it may seem a dampener for hard core techies who take joy in cracking tough nuts by themselves, I am sure these DIY code tools can certainly help the techies too to innovate and re-discover themselves in very new avatars... Need to check what exactly this has to offer. :)

Google launches Android 2.2 SDK

Google launches Android 2.2 SDK - V3.co.uk - formerly vnunet.com

Hmm... a new version of the SDk is out! The article above highlights one of the features - the ability to move applications to SD Card thus giving more space for mote applications to be accommodated on an Android mobile.
This is a minor release and yet there are quite a few noteworthy features, some of them listed below:
1. Multiple keyboard languages - a user can switch between languages by swiping across the spacebar
2. The android mobile can be used as a protable Wi-Fi hotspot from which 8 devices can connect.
3. The camera and gallery have been enhanced with a new UI for controlling zoom, focus, flash, exposure etc.
4. Some of the new platform technologies introduced are a new media framework - Stagefright and bluetooth enhancements
5. For the developers. there are some new APIs introduced in Apps on external storage, Media framework, Camera and camcorder, graphics, data backup, device policy manager and UI framework.

For more details on the above, read the article: Android 2.2 Platform Highlights

Thursday, May 20, 2010

Image Switcher View | Android Developer Tutorial


Now we will explore ImageSwitcher View. It is a view useful to switch smoothly between two images and thus provides ways of transitioning from one to another through appropriate animations.

We will implement the same concept of showing a gallery of images that scrolls at the top of the android screen landscape and upon selection of one image, it gets displayed as a larger image in the lower part through the use of an ImageSwitcher. This is what I had done earlier in the GalleryView tutorial but now instead of showing the selected picture through an ImageView, I will show it using a ImageSwitcher. Though the output may seem very similar, lot of other methods are available on the ImageSwitcher that can be used, if required.

Here is how the output would look (NOTE that I have not used the default gallery background provided by Android in the Gallery images)


So, to begin with, first we need to declare the layout xml to have a gallery and the ImageSwitcher:

<Gallery
      android:id="@+id/Gallery01"
      android:layout_width="fill_parent"
      android:layout_height="wrap_content"></Gallery>
<ImageSwitcher
      android:id="@+id/ImageSwitcher01"
      android:layout_width="fill_parent"
      android:layout_height="fill_parent">
</ImageSwitcher>

The next thing that we need to do is create a class that not only extends Activity but also implements ViewFactory. The ViewFactory is a Interface that creates views that need to be shown in the ImageSwitcher. So it has one method makeView() which we need to implement. It is here that we can set the attributes of the ImageView that would be shown within the ImageSwitcher -  like its background, it scale, its layout parameters etc. – typically those attributes that we would have otherwise statically set through a layout xml.

Here is the class declaration and the method makeView():

public class ImageSwitcherView extends Activity implements ViewFactory {

and
      @Override
      public View makeView() {
            ImageView iView = new ImageView(this);
            iView.setScaleType(ImageView.ScaleType.FIT_CENTER);
            iView.setLayoutParams(new
                        ImageSwitcher.LayoutParams(
                                    LayoutParams.FILL_PARENT,LayoutParams.FILL_PARENT));
            iView.setBackgroundColor(0xFF000000);
            return iView;
      }
This alone is the real difference from the Gallery example.

Other smaller things we need to do is get a handle to the ImageSwitcher in the onCreate() method:

            iSwitcher = (ImageSwitcher) findViewById(R.id.ImageSwitcher01);
            iSwitcher.setFactory(this);
            iSwitcher.setInAnimation(AnimationUtils.loadAnimation(this,
                        android.R.anim.fade_in));
            iSwitcher.setOutAnimation(AnimationUtils.loadAnimation(this,
                        android.R.anim.fade_out));

Here we also set the animation on how the image should fly in and fly out of the area. Then, we get a handle to the gallery and set an ImageAdapter to it. The ImageAdpater is as described in my Gallery Example. If you have not seen that, please go through that and then try this example, as I would not want to repeat myself here.
Now on the click of a gallery image, we would want to pass the selected image to the ImageSwitcher and this is what we do here:

            gallery.setOnItemClickListener(new OnItemClickListener() {

                  @Override
                  public void onItemClick(AdapterView<?> arg0, View arg1, int arg2, long arg3) {
                        iSwitcher.setImageResource(pics[arg2]);
                  }
            });
      }

Tuesday, May 18, 2010

Gallery View | Android Developer Tutorial

Continuing on the Views, I have taken up the Gallery View that helps in showing Images as in a gallery. As per the android documentation, this is the definition: “A Gallery is a View commonly used to display items in a horizontally scrolling list that locks the current selection at the center.”


For this the layout xml in this case, the main.xml will have a ‘Gallery’ element as shown below:

<Gallery
    android:id="@+id/Gallery01"
    android:layout_width="fill_parent"
    android:layout_height="wrap_content"></Gallery>
<ImageView android:id="@+id/ImageView01"
    android:layout_width="wrap_content"
    android:layout_height="wrap_content"></ImageView>

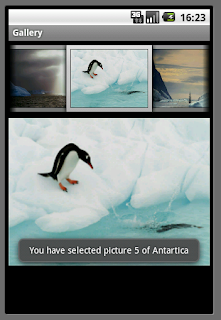
It also has an ImageView element which is used to show the selected Image in a larger ImageView. Here is how it would look when executed.

Now, I create a GalleryView Activity. To view a set of images of Antartica, I have created small sized images of antartica and stored them in the res/drawable-ldpi folder starting form antartica1.png to antartica10.png.

I create an array of these resources/images in my activity with the following code:

Integer[] pics = {
R.drawable.antartica1,
R.drawable.antartica2,
R.drawable.antartica3,
R.drawable.antartica4,
R.drawable.antartica5,
R.drawable.antartica6,
R.drawable.antartica7,
R.drawable.antartica8,
R.drawable.antartica9,
R.drawable.antartica10
};

As we have seen with all the other views so far, we need to have an adapter that associates the view with the data. Here the view is Gallery and the data is the above mentioned 10 images. An Adapter plays the role of linking the two as shown below:

Gallery ga = (Gallery)findViewById(R.id.Gallery01);
ga.setAdapter(new ImageAdapter(this));

However, we do not have a readymade implementation of the ImageAdapter. We have to create our own implementation of the same by extending the BaseAdapter class. This is the core of the code in this example. The moment we extend the BaseAdapter, we have to override 4 methods. They are getCount(), getItem(), getItemId() and getView().

Before we go to each of them, let us see the constructor of the ImageAdpater:

public class ImageAdapter extends BaseAdapter {


private Context ctx;
int imageBackground;


public ImageAdapter(Context c) {
    ctx = c;
    TypedArray ta = obtainStyledAttributes(R.styleable.Gallery1);
    imageBackground = ta.getResourceId(R.styleable.Gallery1_android_galleryItemBackground, 1);
    ta.recycle();
}

}

It takes the context that is passed to the constructor. We need to examine this code a little. First, we can define our own resources or attributes in an XML file. Those attributes can be retrieved through the method obtainStyledAttributes. This is a method on the Context object. The returned value needs to be stored in a TypedArray object. A TypedArray is nothing but a container for an array of values that are returned by obtainStyledAttributes.

So, in my example, I have created an xml file by name attributes.xml in the res/values folder with the following content:

<resources>
     <declare-styleable name="Gallery1">
    <attr name="android:galleryItemBackground"/>
     </declare-styleable>
</resources>

Here Gallery1 is a custom name for a style defined by us. In this style, we are trying to say what should be the background of our images. For that we are using a pre-defined backgournd in R.attr class as galleryItemBackground.

So, this is accessed in the ImageAdapter contructor through the line

ta.getResourceId(R.styleable.Gallery1_android_galleryItemBackground, 1);
ta.recycle();

The number 1 is to say that it is the first element in the attributes.xml file under the styelable Gallery1.

The rest of the over ridden methods are simple:

@Override
public int getCount() {
    return pics.length;
}


@Override
public Object getItem(int arg0) {
    return arg0;
}

@Override
public long getItemId(int arg0) {
    return arg0;
}


@Override
public View getView(int arg0, View arg1, ViewGroup arg2) {
    ImageView iv = new ImageView(ctx);
    iv.setImageResource(pics[arg0]);
    iv.setScaleType(ImageView.ScaleType.FIT_XY);
    iv.setLayoutParams(new Gallery.LayoutParams(150,120));
    iv.setBackgroundResource(imageBackground);
    return iv;
}

The getView actually returns a View object when called. Here I have overridden it to return a ImageView object with the selected image inside it alosn with some scale, layout paramaters and the image background set.

Finally in the onCreate() method of the activity I have captured the onClick event on a Gallery item and within that I have toasted a message as well as displayed the image in a bigger manner below the gallery:

ga.setOnItemClickListener(new OnItemClickListener() {
@Override
public void onItemClick(AdapterView<?> arg0, View arg1, int arg2, long arg3) {
    Toast.makeText(getBaseContext(), "You have selected picture " + (arg2+1) + " of Antartica",
        Toast.LENGTH_SHORT).show();
    imageView.setImageResource(pics[arg2]);
}
});

That is it. You may download the complete code from here.